Before you start
You need:
- Microsoft 365 with SharePoint Online.
- A SharePoint Administrator to upload the package to your tenant app catalog, and an Application Administrator (or Global Administrator) to approve its API access.
- A SharePoint site for Timesheet, where you are an owner. A new team site works well.
- For each person who will log time: a Microsoft 365 licence that includes SharePoint Online.
Start a trial or buy
On the buy page, choose a plan, enter your Microsoft 365 domain and confirm your tenant. Then start a 30-day free trial (no card) or buy now. The page you land on after checkout has two things you need:
- Grant admin consent. A global administrator follows this link once. It adds Akora's service app to your tenant, which SharePoint needs before it can approve the licence permission in API access. Read the security page before you accept.
- Download the package (
.sppkg) with the button on the page Stripe returns you to after checkout. If there's no button there, email support@akoracloud.com with your Microsoft 365 domain and we'll reply with the package. Stripe emails a receipt for each payment (a free trial has none, since nothing is charged); invoices are in the billing portal.
Get access to the app catalog
In the SharePoint admin center, go to More features → Apps → Open. If you see no Upload button and this banner, you are not yet an admin of the app catalog site:

- Go to Sites → Active sites and select the site named Apps.
- Open Permissions → Manage admins and add yourself as a site admin.
- Go back to Manage apps and reload. Upload now appears.
Microsoft requires this for the app catalog. It isn't a Timesheet setting.
Upload and enable the package
- In Manage apps, select Upload and choose the
.sppkgfile. If an earlier version is there, choose Replace. - In the Enable app panel, keep the defaults and select Enable app.
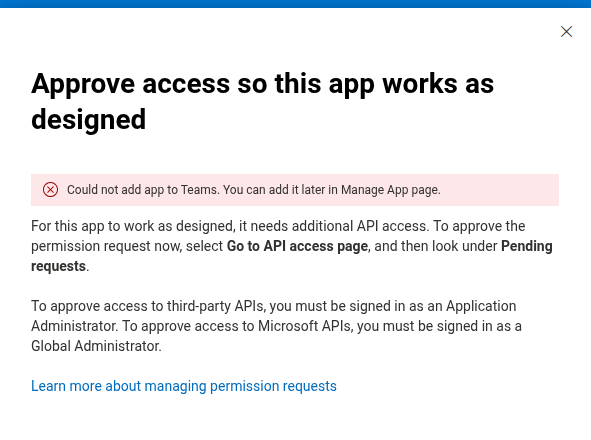
The next panel, "Approve access so this app works as designed", may show a red banner: "Could not add app to Teams. You can add it later in Manage App page." You can ignore it. Timesheet is used as a SharePoint page and does not need to be added to Teams; the upload has worked.
Approve API access
Select Go to API access page, or in the SharePoint admin center go to Advanced → API access. Under Pending requests, approve the four requests from Timesheet:
- Microsoft Graph,
User.Read.All - Microsoft Graph,
Group.Read.All - Microsoft Graph,
Mail.Send: sends the emails when a week is submitted, approved or sent back, from the mailbox of the person who acted (see Email) - Akora Timesheet Vendor API,
License.Read
Microsoft grants these to one shared SharePoint app that every SharePoint Framework app in
your tenant uses. Group.Read.All also lets Timesheet recognise owners of
the site's Microsoft 365 group as admins (see Admins). If you leave Mail.Send unapproved, Timesheet works and
sends no email.
If a request isn't in the pending list, look under Approved requests. An earlier install, or another app, may already have approved it. Approving Microsoft Graph permissions needs a Global Administrator; the Akora one needs an Application Administrator. The security page explains what each one is for.
Add Timesheet to a site
Timesheet is a full-page app. It is not listed under Site contents → New → App, so add it as a page:
- On your site's home page, select New → Page.
- In the template gallery, under Full-page apps, select Timesheet, then Use this template.
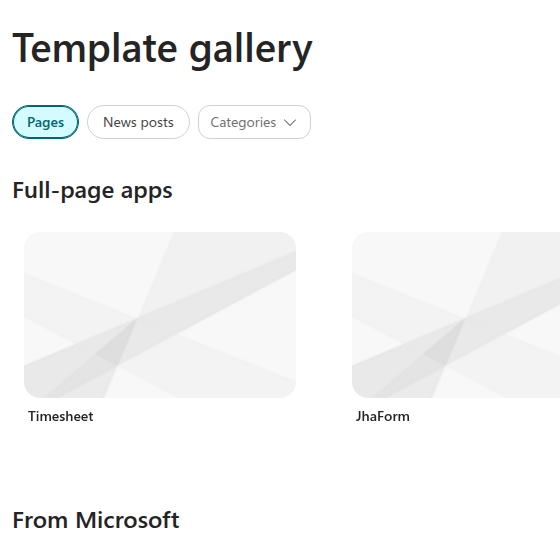
The new page opens in edit mode, and Timesheet starts its first-run setup (next step). When the setup checklist appears on top of the page, close it with its × first: the page's Title box is behind it. Type a title such as "Timesheet", then select Save. Your work in the checklist is kept, and it opens again from the page.
If a Timesheet link doesn't appear in the site navigation after you save, add one with Edit navigation, so your team can find the page.
First run takes 1 to 2 minutes
The first time the page opens, Timesheet creates the SharePoint lists it uses in this site. This takes about 1 to 2 minutes; keep the page open while the progress bar runs. It needs to be done by someone who can manage the site, such as a site owner.
Later, the first time someone opens Timesheet in a new browser session, it briefly checks those lists before the app appears. If the setup reports an error, select Retry setup; if it fails again, check that you are an owner of the site and contact support.
People and approvers
- Access. Everyone who logs time needs access to the SharePoint site. Add them to the site's Members group (Settings → Site permissions). Adding someone to a project in Timesheet does not give them access to the site.
- Admins. Site admins of the SharePoint site are Timesheet admins and see the Admin tab. On a Microsoft 365 group team site, the group's owners are site admins.
- Approvers. A week goes to the person's manager in Microsoft Entra ID. Set the Manager field for each person in the Microsoft 365 admin center or Entra ID; Timesheet has no manager field of its own.
- Project leads. To let a project's Lead approve that project's weeks, also add them under Admin → Workspace settings → Approvals. That gives them the Approvals tab.
- Admins can approve or reject any submitted week in Admin → Pending timesheets, except their own unless Admins may approve their own week is on in Workspace settings (then it is marked "self-approved").
The setup checklist and going live
After the first run, admins see a setup checklist. Until the workspace goes live, other people can't log time. Work through the cards:
- General settings: the working week and hours per day, the first day of the week, language and date format.
- Clients, Projects and Tasks (required): add at least one of each. The PTO project that Timesheet creates for time off doesn't count.
- Import master data: bring them in from a spreadsheet instead (see Import).
- Accent colour and Admin roles are optional.
- Final check runs a quick health check, then Go live.
Clients
Admin → Clients → New client. Give the client a name and, if you like, a short code. Archive a client to hide it from new projects; its history is kept.
Projects and their people
Admin → Projects → New project. Choose the client, the name and code, whether the project is billable, and optionally planned hours.
Check the start date. It defaults to today. Nobody can log time on a project before its start date, so if your team will log earlier days (for example, the rest of this week), set the start date earlier. Those days show as locked in the grid, with the reason.
On the project's Members tab, add the people who will log time to it, as a Member, a Lead or an Observer (can read but not log time). People only see the projects they are members of.
Tasks
Admin → Tasks. Add tasks under each project, such as "Design" or "Testing". A task can be billable or not; time logged to it follows that setting unless an entry overrides it.
Holidays
Admin → Holidays → New holiday. Add each holiday with its date, a title and
a short label. Leave Region blank for everyone, or enter region codes such
as CA-ON or GB to limit it. Whether people can log time on a holiday
(block, warn or allow) is a Workspace settings choice, and each project can change it.
Import from a CSV file or a SharePoint list
Admin → Import data creates clients, projects or tasks in bulk. Choose what you are importing, upload a CSV file or pick a list already in your site, then match its columns. The preview shows which rows are new, which already exist (skipped) and which need attention, before anything is created. Import clients first, then projects, then tasks.
| Importing | Required columns | Optional columns |
|---|---|---|
| Clients | Name | Code, Billable |
| Projects | Name, Client (an existing client's name) | Code, Billable |
| Tasks | Name, Project (an existing project's name) | Client (when two projects share a name), Billable |
Billable accepts true/false, yes/no or 1/0. For example, a clients file:
Name,Code,Billable
Contoso Ltd,CON,yes
Fabrikam Inc,FAB,yes
Log and submit a week
- On the Timesheet tab, select Add project to this week and pick a project. Its tasks appear as rows.
- Type hours in the cells as
1.5,1:30or90m, then press Enter or Tab. - Hover a cell and select the note icon to add a note to an entry, or to change whether it is billable.
- Copy last week fills this week from last week's entries. It appears once this week has at least one project.
- On a phone, use Quick add to log one entry at a time.
- Select Submit week, check the summary, and select Submit for approval. Until it is reviewed, you can recall it.
The Help button lists the keyboard shortcuts.
Approve weeks
Approvers see an Approvals tab with the weeks waiting for them. Open a week to see its hours and notes, then Approve it or Reject it with a reason. A rejected week goes back to its owner with your reason, and they can change it and submit again. Admins can also approve or reject from Admin → Pending timesheets. No one approves or sends back their own week unless that setting is on.
Timesheet sends an email at three moments: when someone submits a week (to their approvers), and when an approver approves it or sends it back (to the person). Timesheet sends each email from the mailbox of the person who acted, as them, so it appears in their Sent Items. After every submit, approve or send-back, the app says who was emailed, or why no one was.
- Wording. Timesheet has built-in wording for all three. To use your own,
go to Admin → Notifications → Templates, write a template for the moment,
and switch it to Active. The editor lists every variable you can put in
braces and what it holds for that event:
{RecipientName}(who the email goes to),{SubmitterName},{ApproverName}(on submit, the approver it goes to; on a decision, the one who decided),{WeekRange},{TotalHours},{Comment},{ReviewLink}and more. The preview fills them in the way a real email for that event would. A name that isn't a variable is sent as typed. - What was sent. Admin → Notifications → Sent notifications lists every email. "Handed to Microsoft 365" means Microsoft accepted it (whether it reached the inbox isn't known; a bounce goes back to the sender). An email that fails never stops the submit or approval; the week still moves.
- No mailbox, no email. Someone without a mailbox isn't sent to; the app says so ("they'll see it in Approvals") and the log shows "No mailbox: not sent".
- Never to yourself. Timesheet doesn't email you about what you just did.
-
If nothing is sent, check that
Mail.Sendis approved in API access and that the sender has a mailbox.
Reports, history and CSV export
The Reports tab shows hours by week and by project, billable and non-billable time, and utilization, over the last 4, 6 or 12 weeks. The History tab lists your recent weeks with their status and totals.
Under Report and export on the same tab, pick a date range (up to 400 days)
and, if you like, a person, client or project, then select Show report. The
totals on screen are the sum of the rows. Download CSV saves the same rows
as a file that opens in Excel, with these columns: person, date, project code, project,
client, task, hours (as a decimal and as h:mm), billable, status, approver, approved on (the
day in your time zone), approval check ("Before verification", "Self-approved" or
"Can't verify", for an approval or a send-back), changed after approval, note, and, last,
approved at (the time, with that zone's offset, such as 2026-11-14T21:09:00-06:00).
Status and approver come from the week's verified approval (see
Integrity check).
In Excel: the file is UTF-8 with commas between columns. Hours is a
number with a . decimal point, so add up that column. Hours (h:mm) is for
reading: Excel may treat 4:30 as a time of day, so a sum of it passes 24 hours only
if you format the cell [h]:mm. If your Windows region uses a comma as the decimal
point (French or German settings, for example), open the file with Data → From
Text/CSV and choose comma as the delimiter and . as the decimal
separator, rather than double-clicking it.
You see your own time; approvers also see the people whose weeks they approve, and admins see everyone. The app enforces this, not SharePoint. See who can see what.
Integrity check and locked lists
The first time a site admin opens Timesheet (on a new site, or after an upgrade), it locks its lists: the project, settings and other admin lists become read-only for everyone but the site's Owners, and the approval records, audit trail and email log let members change only their own items. Later admin visits check that the lists are still locked. If a list can't be locked, Admin says which and why; Admin → Integrity shows when they were locked and by whom. The security page lists them.
SharePoint records who created and last changed every list item, and members can't change that record. Timesheet uses it to decide which approvals count. A week's status comes from its approval records, not from the status stored on the entries. An approval or send-back counts when the person it names wrote it. That person must also have been a site admin or a project lead approver (under settings a site admin saved) at the time, or be in the person's manager chain in Microsoft Entra ID. A manager of other people who isn't found in the chain still counts, flagged "can't verify" for an admin to Accept or mark Don't count. Nobody decides their own week unless Admins may approve their own week was on at the time (marked "self-approved"). Decisions from before the lists were locked keep counting, marked "before verification". Entries changed after their week was approved are marked "changed after approval". Hours are never hidden. The security page lists the limits.
Admin → Integrity lists, for a date range (up to 92 days; it opens on the last 60 days and the next 30), everything that doesn't count, can't be verified, is from before verification or is self-approved, and entries changed after approval, with who wrote each and when. Project or workspace settings last changed by someone other than a site admin give no approval rights until a site admin confirms them: Confirm routing shows each change and how many past decisions would start or stop counting, then confirms exactly what it showed. Meanwhile admins can still decide every week in Admin → Pending timesheets. If the check can't run, it says "Couldn't check" and why.
Admins and Microsoft 365 group owners
Timesheet admins are the site's site collection administrators. On a site connected to a
Microsoft 365 group, the group's owners are site admins through the group, and Timesheet reads
the group's owners with Microsoft Graph Group.Read.All (approved in
API access). If Admin shows "Timesheet couldn't confirm your
admin rights", approve Group.Read.All, or add yourself directly under
Site settings → Site collection administrators. Until then your changes in
Admin count only in your own session; other people's Timesheet doesn't count them. Locking
the lists also needs a site admin: if Admin says the lists aren't locked, open Timesheet as
a site collection administrator.
Admin roles
To give someone part of the admin work without making them a site admin, map a Microsoft Entra group to a role in Admin → Admin roles. Members of the group get an Admin tab with only their role's pages:
- HR admin: holidays and delegations.
- Finance admin: the Billing page.
- Program manager: projects, tasks and project members.
All three can report on and export everyone's time. Saving a role gives its group edit rights on the lists that role changes; everything else stays read-only to them. Project leads and delegations that a role holder sets up start counting for approvals once a site admin confirms them under Admin → Integrity. A change to someone's group membership applies the next time they open Timesheet.
Users and your plan
A person counts against your plan if they can log time: an active member or lead of at least one project that isn't archived. Observers and paused members don't count, and each person counts once, however many projects they are on. Admin → Billing shows how many users you have and your plan's limit. At the limit, adding a new member or lead, resuming a paused member or making an observer a member is refused with a link to upgrade; people already counted can still be added to more projects, and observers can always be added. Archiving a project, pausing someone, making them an observer, or removing them from every active project frees their place. If you move to a smaller plan with more people than it includes, no one is removed or blocked; Billing shows that you are over the limit.
Your licence and billing
Admin → Billing shows your plan, its status and how long it runs (on a trial, when the trial ends). After you buy or renew, select Check now to fetch the latest licence. Manage billing opens the billing portal, where you add or change a card, download invoices, or change or cancel your plan.
When a trial or subscription ends (a trial without a card ends on its last day; a cancelled subscription ends at the end of the year you paid for), Timesheet becomes read-only for 30 days. Everyone can still open it, see their weeks, history and reports, and download CSV exports, but no one can log, submit or approve time; a banner links to renewing. After that, Timesheet stops opening until you buy or renew. Your data stays in your SharePoint lists the whole time. See the policies page for refunds and renewals.
Getting help
In the app, the Help button shows this guide's address, the support email and your version number. Email support@akoracloud.com; the support page says what to include.